Thanks for stopping by. For a peek at my studio click here.

Sunday, August 27, 2017

Bowl Swap - Complete

I received my polymer clay bowls from the bowl swap this week.

I am really happy with them. They are all different and each used different techniques. Seeing the possibilities has been great.

Here is a sample of the bowl I sent:

My Design using a swirly cane

Here are the bowls that I received in the swap.

From above

WOW! So pretty. Delicate Silver Paint

Reminds me of a Mermaid tail

Inside of the Mermaid Bowl

Lovely Iridescent Wavy Bowl

With a beautiful textured bottom

I'm glad I decided to join in on the swapping fun. Not only did I have a great time making bowls, now I have some different bowls to learn from.

Saturday, August 26, 2017

Polymer Clay Challenge - Week 34


Week 34 head for the polymer clay challenge. Getting ready to bake. I am very happy with how this person turned out.

I am trying to get back in the groove of making heads each week. I lost a few weeks making the full dolls but I think I can do both... we shall see.

I am working on the arms and legs of my ball jointed doll. So far I am really happy with how she is coming out.

I'll post more pictures of her later this week.

Wednesday, August 23, 2017

Kayaking Loch Ness

Loch Ness, Scotland

When I was a little girl I spent a lot of time with my grandparents. My grandfather was an amazing man. He was a gardener, a fisherman, a boater and more. He taught me how to drive and dock a boat and scale a flounder before I was 10. He also had a subscription to National Geographic magazine. If the weather was bad I would pour over the stack of bright yellow magazines and dream about visiting some of those far away places.

There were so many that I wanted to see, but Loch Ness in Scotland was the number one. I loved the lore of the Loch Ness monster. The stark beauty of the surrounding area and the strength of the Scottish people. That is what I took away from an article in National Geographic magazine about Loch Ness.

When we started planning our trip to Ireland and Scotland each member of our party selected one thing they wanted to do. Mine was kayaking on Loch Ness. Everyone was up for the adventure and that day was one of the highlights of the trip, for everyone.

We started our day in Culloden. I will post those pictures on a later date. After spending some time on the battlefield we made our way to where we thought we were supposed to be and got very lucky that our guide had returned to his office to get additional kayaks for our tour. We followed him to the dock.

He provided us with water proof pants. We all thought is was a bit silly but we put them on and went on our journey. When the rain started we were happy to have them but it was so beautiful we really didn't need them long.

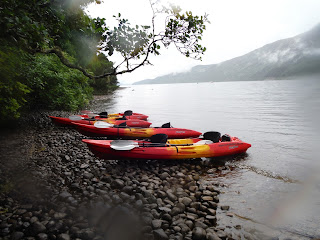
Being on the water was amazing. The water itself looks almost black due to the peat particle floating in it. Looking out on the lake, if you are a fanciful person (I am), you can see how Nessie could survive all these years without detection. The lake is vast and dark. It is shrouded in areas with mist. It is beautiful.
Launching Dock

Heading out to the Loch proper

The weather changed often. It rained, was hot and sunny, rained again 
and was beautiful the entire time. 


Our guide has us stop on this rocky shore for hot chocolate and cake. He sent my son and his friend out into the Loch to fill the tea kettles with water.

My son and his friend


The mist shrouded shores were awesome!

My son and his best friend drinking Hot Chocolate made from Loch Ness water

Here we are, wet and happy on Loch Ness

A Castle on the Loch

Our Kayak Guide

Loch Ness

We did see Nessie. She was much smaller than I thought she would be.

Another Kayaker

While we were out with our guide a couple of kayakers came in from further out on the lake. They also had Nessie with them. 

If you ever get the chance to kayak on Loch Ness take it! It was a magical part of our trip. One that I will cherish forever and hope to repeat.

Sunday, August 20, 2017

Ireland Vacation - Continued

It's been a year since I went to Ireland and Scotland and I still haven't shared all of the pictures that I wanted to, so here is one more snapshot of my trip...

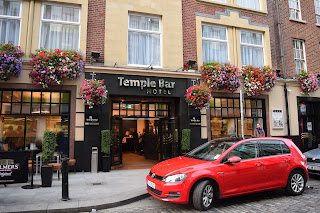
In Dublin we stayed at the Temple Bar Hotel in the Temple Bar district. An amazing area full of shops, pubs, restaurants and, of course, lots of tourists and college students.


Remembering the Famine


One of the things I love about Ireland is the abundance of flowers. They are everywhere. Hanging from the light poles, from the eves of buildings and in pots and containers on steps and streets. It is beautiful to see. 


As in most large tourist districts you will find street performers. We enjoyed seeing the many young artists performing near out hotel. 


This picture was taken in the afternoon, by evening the streets were packed with people, most of them enjoying the lovely Dublin night, looking for music and a pint.

Temple Bar Hotel (and one of our cars)

If you head to Dublin and decide to stay in the Temple Bar area be sure to pack ear plugs. It is a loud, boisterous area, full of music, pubs and lots of college kids having fun and sometimes kids that have had a wee bit too much fun. Fortunately they wash the streets every morning in that part of town so the ramains to the previous nights indulgences are gone.

Friday, August 18, 2017

Now for Something Completely Different

Is anyone else old enough to remember the Bullwinkle show? That phrase always reminds me of Bullwinkle. The rest of this post has absolutely nothing to do with moose and squirrel though, it is about Vanilla.


Last year I made my first batch of vanilla. I actually made three different kinds. Tahitian, Indonesian and Madagascar Bourbon. I was surprised by how different the three were. The Tahitian and Indonesian were much lighter than the full bodied Madagascar Bourbon. My favorite of the three is the Madagascar, it is more like a traditional vanilla for baking and I use it all the time.

This year I purchased additional vanilla beans to make vanilla as gifts and found that due to major storms through the vanilla growing area as well as some market speculators the cost of vanilla beans has more than doubled! Yikes! I still bought the beans and my vanilla is happily seeping away.

The whole experience had me researching how vanilla is made, where it is grown, what affects the blooms, etc... so what did I do, I bought two vanilla plants. I enjoy gardening and growing interesting plants and since Vanilla is not native to Nevada it will be a houseplant. A lovely green, viney houseplant that requires lots of love an attention.

I ordered 2 plants from a nursery in Florida for roughly $20. I then spent almost $100 on their new home.
 
Here are my two vanilla plants. They are sitting in a tray of rocks covered in water to increase the humidity around them.


The vanilla plant is an orchid and a vine. It will attach itself to the trellis as it grows and if I am lucky, once it has grown up and over the trellis it may bloom. If that happens I will be hand pollinating the blooms and then, maybe, about 9 months later will have a vanilla bean. Fortunately, I am willing to wait for 5 or so years to see if my vines ever produce vanilla beans.

for those of you interested in making vanilla at home...

I used Madagascar bourbon beans and Kirkland Vodka. Ratio of 7 beans to 1 cup of vodka. Slice each bean lengthwise then cut into small (2-3 inch) pieces and place in a seal-able bottle, cover with vodka and shake. I store mine in the pantry and shake it every couple of days for the first month, then once a week (or when I remember) for the next month. You can start using is after 2 months though in my experience vanilla ages beautifully and the flavor deepens over time.

As sources for vanilla beans and information on vanilla I like both Beanilla and Vanilla Bean Kings. Both are great sources for information and beans :)

Enjoy!

Wednesday, August 16, 2017

Another Contest from ArtDolls.Com - Steampunk Ball Jointed Doll

I am having such a great time working through the ArtDolls.Com contests. The current one is a simple ball jointed doll. If you are interested in joining in on the fun here is a link to the contest kit.

I have never made a ball jointed doll before. Until this week I did not think I was skilled enough to do it, however, joining this contest has changed that.

Here is the start of my ball jointed doll.

Head

Head sitting on torso

 Head and Torso

The contest is for a simple ball-jointed doll dressed in Steampunk fashion. The video demonstrates sculpting a much younger and smaller doll than what I am creating but I am utilizing the same techniques so I should be OK. 

I don't sculpt child like dolls and since this sweet girl wanted to be here I just went with it. I will be working on her arms, legs, hands and feet this week. She is due before September 15th as is the Art Doll Quarterly entry for their Age of Aquarius challenge which I am also working on. 

This has been an exciting project for me. I tend to procrastinate when I am unsure of something but in the very beginning of the videos that go along with this contest Arpyl Jensen tells you to take it one step at a time. You focus on one part of the doll, for instance, it isn't overwhelming to sculpt a single leg. Then you focus on the next, then the next until you have a complete doll. So I sat down and sculpted her head, then I moved on to her torso. Next I'll do her legs... I am thrilled with how she is turning out and I am really looking forward to costuming her. I love the Steampunk style and had so many ideas I may need to make friend for her so I can do more than one costume!

Another new process I will be experimenting with on this doll is blushing and painting with the Genesis heat set paints. I've seen them used. I have them, but I've never used them, so with this doll I will be using them which is why she has no color on her face.

Once again I have to say... seek out challenges for your art. Try something that scares you. Your skills will grow by leaps and bounds.

Monday, August 14, 2017

Published!

My doll Punk Rock Girl has been published. I cannot tell you how amazing it feels to have one of my dolls in this magazine.

Here she is
Punk Rock Girl

A tribute to Debbie Harry of Blondie

Saturday, August 12, 2017

Art Dolls Tiny Elfin Doll Contest

As you know I entered a doll into the ArtDolls.com Tiny Elfin Doll Contest. They had 2 different ways to win, judge's choice and people's choice. I WON people's choice. I am so excited.

Not only did I win 6 bars of ProSculpt clay (my favorite for dolls) I also won registration for one of Jack Johnston's or Apryl Jensen's sculpting classes.

I am so excited! I have always wanted to take a class from both of them. Now I get to.

Here is the doll that won:

She is such a cutie.


Here is her sister

Regardless of the medium you work in, I highly recommend seeking out contests and challenges. The contests I have entered have improved my skills. You never know how far you can go until you start to try things you have never done.


Thursday, August 10, 2017

Bowl Swap

I am taking part in the 2017 Polymer Clay Adveture. Learning fun things and just making time to play with clay.

This month I joined a bowl swap. I'd never made a polymer bowl before but I had seen some amazing ones.


Here is the bowl I am sending in for the swap. (I made 3 of these cuties). They are about 2.5 inches wide and have 3 feet.


Here is another one I made using the same clay cane. I would have sent these but I ran out of the cane.

I have so many ideas for clay bowls now! These are decorative bowls, not for use with food. I am thinking rings, change, just for fun... I will definitely be making more.