Thanks for stopping by. For a peek at my studio click here.
Showing posts with label Fairy. Show all posts

Friday, May 25, 2018

I'm back... Steampunk Fairy Class pic


I am finally able to relax... I finished my degree. I'm heading to Las Vegas soon to walk in the graduation ceremony. I am taking the summer off and then we'll see. I may go back to complete my MBA, I may not :0)

Below is a picture of the steampunk fairy I made in the Deb Wood class I took in Florida. To say my skill level increased is an under-statement! Deb is an amazing instructor. She didn't take over, she instructed. When I had a problem or just couldn't' figure something out she would show me, but she would not do it all for me. 

I am thrilled with how this turned out. I am looking forward to sculpting more often now that school is over. 


I will post more pictures of class and this amazing fairy soon.

Now that school is over I am going to finish the ball jointed steampunk doll.

Thanks for sticking around!

Saturday, May 27, 2017

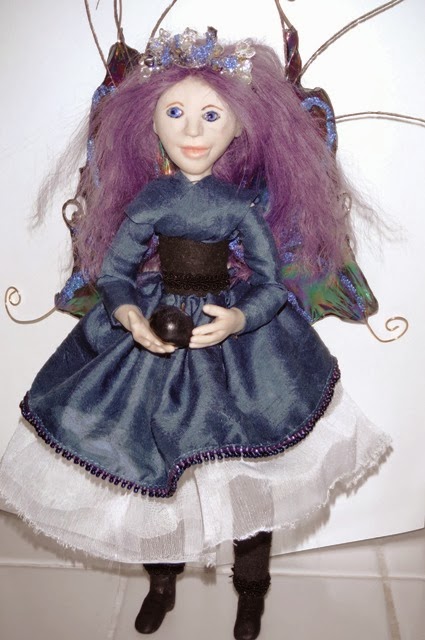
Lilac Fairy


I finished this sweet girl for the Jack Johnston fairy contest and displayed her at the Quincy Quilt show.


Tuesday, March 10, 2015

Fairy Doors Part One for Week 10 of the 2015 Polymer Clay Challenge


Here are a couple of the finished "tie-dye experiment 1" doors. I'll post more later :0) I will be working on "Tie Dye Experiment 2" this weekend - hopefully!!

Thursday, March 5, 2015

2015 Polymer Clay Challenge Week 10 update


For the 2015 Polymer Clay Challenge this week I had planned to work on boots and feet but then something amazing happened while I was playing in the studio and I took a detour!

I've been trying to get a nice tie-dye look in clay for a Fairy Door project I've been working on. I've tried the Lentil Bead swirl technique, the marbling technique and just mashing colors together to try to get the right look. This week I've taken the cool clay results from these experiments and I am putting together some Fairy doors with them.

Lentil Bead 

Here is one of the Fairy Doors! It hasn't been baked yet and still needs a bit of detail work done but I really like the colors. Tomorrow I'll be posting pictures of the completed door as well as the rest of the doors I made... once they are all baked!

Fairy Door

I am thrilled with the results of this project and I will definitely be playing more with the  Lentil technique. I think with the right size ball of clay I'll be able to get a tie-dye swirl look on a fairy door. The issue is distortion. If I put a Lentil bead through the pasta machine (which I did for the door above) it distorts the pattern, however, if I press the bead flat it doesn't distort as much. So if I have a large enough Lentil bead I should be able to flatten it enough to cut a Fairy Door from it...

I'll keep you posted :0)

Next week I'll get back to feet and boots, or maybe hands but then again I may make more Fairy Doors, I guess the cool thing about the challenge is that the goal is to work with clay every week and expand your skills. So far I am doing just that!

P.S. - I'm still working on the right clay mix for my rocks. I've almost got it right. Once I get it to where I like it I'll be doing a tutorial on rock making. It will have ingredients I use as well as the clay colors and proportions.

Wednesday, October 1, 2014

Sneak Peek

Here are a couple of sneak peeks of some items I have been working on for the Arts & Craft Show - which is less that 3 weeks from today - Yikes!


As you can see each of these is in a different stage of completion. The center piece will be a fairy sitting on a swing in a bird cage - yes, I have a think about bird cages who knew!

Santa is ready to go and the pumpkin head sculpt is getting the finishing touches this weekend. I have a magnificent cone fairy that is almost done, I'll share her soon. Her base was made with one of the cones I wrote about here. I had no idea what I was going to do with them but I am so glad they've been sitting in my studio all this time!

Check back soon for some fun glimpses of the "less that 3 weeks to go" chaos!


Tuesday, May 27, 2014

Progress

This is just a quick post to show you the progress I made over the weekend.


The sculpture I started last week has been fleshed out and I painted her face. I am really pleased with how she is coming along. I‘ll show a lot more in progress pictures later this week, I had such a great time working on these that I just had to share some pictures.


I also sculpted this tiny fairy. She is 8 inches tall and is supposed to be another birdcage fairy but I think she likes the martini class she is sitting in way too much so she’ll probably get her way and be posed in it!

That’s it for now!

Sunday, May 25, 2014

Up Next...

This week I submitted an application for a Craft Fair. It is, in my opinion, the best one in our area and I would be honored to be a vendor. It is a juried show and I had to submit lots of pictures with my application. I should hear something in the next couple of weeks. I am exited though trying to not be. I've already decided that if I don't make the cut I'll still be making the items I have planned and be putting a lot of things on my Sunflower House Art (SHA) Etsy shop which is currently up and ready but not stocked so not open.

I've waited until now to open the SHA Etsy shop because I really didn't want to sell any of my sculpted work until I was proud of the quality of my work. I love what I do, I am very happy with the quality of my sculptures and I am ready to share it with the world. So, you'll be seeing a lot more activity on this blog as I post progress pictures, regardless of which direction life takes me.


Here is one of my current works in progress. She just came out of the oven and I have a couple of ideas for her, we'll see which one she prefers.


I'll be working on the Birdcage fairy this weekend as well. She is still in the same state of costuming that she has been in for months. She is not going to be put up for sale so I am not in a hurry to finish her. I really love her and I've decided that she is going to be hanging out here in the studio rather than fly off to a new home.

My thoughts for the show and the shop both are of creating a mixture of regular and zombified sculpts, I have so much fun with the zombies and I think it shows, there is just somethings fun and fascinating about them. I'm also making a couple different styles of stands and hanging display boxes for my work. A good stand can truly make or break a piece.

I'll keep you posted!

Friday, March 7, 2014

Indigo

Indigo

Well, Indigo arrived in her new home on Wednesday so here are her progress pictures as pomised:


I wanted to use the indigo color hair I dyed along with some black and this is what I ended up with. Neither of us were pleased with the results so this hair was peeled off and I started over.


This color worked much better and I had tons of it. I washed and conditioned the pelt and let it air dry to keep the lovely waves.


We have hair! She liked this color so much more than the black/indigo combo.


Fleshing out the body. This time I did go for a much smaller waist than the Birdcage fairy has. 


We now have skin. As you can see her waist is really too small but once I add the clothing it will look closer to normal. 

Ready for Clothes

Wings

Closer


Side View

As you can see her over skirt has been beaded. I love this technique. It really finishes off the skirt. She is holding a blueberry in these pictures. 

Indigo


It is hard to see the detail on the wings. These wings were created using Fantasy Film and Wire. Once I had the wings created I added beads and feathers to finish them off. She turned out pretty darn cute for only having a week to work on her. 


Monday, March 3, 2014

Indigo is on her way

I mailed Indigo off to her new mom today. After she arrives on Thursday I'll post the rest of the pictures of her progress including pictures of making her wings.

Next up I'll be finishing the birdcage fairy. She is getting pretty impatient since she is so close to being done but got bumped for Indigo. Her tiara is done. I just need to finish her costume and make her wings. Then I'll need to find a way to get her on the perch of her new home.

I'll also be making some curtains for the bottom of the birdcage and possibly a chair. As you can see this birdcage has lots of potential!


The sweet little fairy will be sitting on the perch in the main cage if I can get her safely in there. The opening to the lower portion of the cage is fairly small so I will have to remove the door. Hopefully she'll be complete this weekend.

Thanks for stopping by


Monday, February 24, 2014

Indigo Fairy - The Beginning

I love online swaps and recently I joined one called Needful Things which is being hosted by Val over at Yarnigras Swapper Spot. We are to make at least one of the items we send our partner and then can either purchase or make at least 5 other fun things. Well, after careful deliberation I chose to make a fairy for my partner in her favorite color. I know that the fairy will exceed the $30 package cost but I am too excited about making her to care!

Armature

Taped and Ready for Clay

Tools of the Trade

Baked and Ready for More

This sweet little fae must be complete and mailed by this Saturday so I'll be moving pretty fast on her. 

Yesterday I dyed several hanks of fabric including some Dupioni Silk and a nice cotton sheeting along with a small pelt of Tibetan Lamb.

Original Pelt

Rinsed and Ready to Go

Tools

In the Dye

I searched the internet and found several ideas for dying the hair but the products they mentioned (other than Kool-Aid) were either not available locally or were not in stock in the color I needed, so I decided to experiment.

I am using Dylon permanent fabric dye in a deep blue. Since this dye is also suitable for silk and wool I figured it should work.

To start I had to mix the dye with 4 cups of water and stir it until the dye was dissolved. Note – use a bigger bowl than I did. When stirring I managed to spill it on my white tile counter. The good thing is that it did clean up easily but I will have to take some scouring powder and scrub the grout to remove the last traces or dye.
I then rinsed the hair I planned to dye and gently patted it with a paper towel to remove the excess water.

Next I filled a container with enough water that the hair could move freely and added 4 tablespoons of salt. Stir to dissolve the salt.

Once the salt was dissolved in the water I added the dye, stirred it until it was completely combined with the salt water then in went the pelt of Tibetan lamb.

Now we wait. I let the pelt soak in the dye for an hour, checking it occasionally. I can tell you during the entire process that I had no idea how the hair was taking the color. The dye was just too dark and I didn’t want to rinse it early.


Once the hour was up I rinsed the pelt in warm (not hot!) water, combed it out and let it dry. Not too bad. I then let it sit in the dye overnight and got a slightly darker color. Next time I will either order the color I want from someone or order the correct dye online. 

Dry and Ready to Use

Thankfully the fabric I dyed is stunning and perfect for her costume and the Tibetan Lamb will work just fine to add streaks of color to her hair.


More Birdcage Fairy Progress Pictures

I am getting closer to the finish line with the Birdcage Fairy. Her costume is almost done and then I'll finish her hair and create her wings. I've had a quick project come up that has put a hold on her until this weekend. See bottom of post for more info!

Costume Detail

Tiara - final Bits


I am currently involved in an online swap called Needful Things and I am creating a fairy for my partner in her favorite color. Check back later today to see the beginnings of the Indigo Fairy.


Thursday, February 13, 2014

More Progress Pictures

Here are a few more in-progress pictures of the little faerie.

Mohair is a fabulous medium to work with. You can use styling products on it just like you do your own hair. It is easy to curl and if you don't like the way the hair style turns our all you have to do it wet the hair and comb it.


In the first two pictures I used a dowel that I cut into approximately 1/2 to 1 inch pieces and warpped water dampened hair on, making super easy curlers. I then clipped the "curlers" in place using these darling clips that I found at the dollar store. You can use larger dowels to change the size of the curls. I recommend sanding the edges of your "curlers" so the curled hair doesn't tangle in the cut edge. 


Her hair is full of curlers. She is just waiting for everything to dry to see how they turned out. 


Once her hair dried I was able to remove the curlers. Right now her hair is still a little wild. She'll be getting a crystal tiara and some additional curls once she is costumed. At that time I'll really be playing with those curls. 


She finally got her skin! It still looked a little rough here but that is OK! All of the "muscle" is now covered and she has a shape to her. Since she a younger faerie she does not have that slim, hourglass, figure but I think she is going to be just fine. 


This is the preliminary base of her wardrobe. She still needs lots of work but she is really coming along. I hope to finish her costume this next week and then get to work on her wings and tiara. 

Stay tuned for more progress pictures - hopefully soon!

Saturday, February 8, 2014

Update - Fairy Progress


This is where she was when I updated last week. She had a basic face and limbs but that is it!

Hands and Feet!


Checking her proportions

Fleshing out the body

A little bit of makeup


HAIR!

Here is where we are now.

Now I am waiting for her hair to dry so I can style it. Next up I'll be adding a body stocking to hold everything together and then I'll work on her wings, costume and crown. A new bead shop opened up in Reno so I now have a great place to get what I need to make fairy crowns.