Thanks for stopping by. For a peek at my studio click here.
Showing posts with label Mermaid. Show all posts

Thursday, April 16, 2020

Well That Didn't Go as Planned...

So 2020... WTF

This year started off OK. My mom managed to get through the first holiday without my Dad and then we go through the anniversary of his death in early January. Sounds sad but it was a healing time for my family.

In February my hubby and our 2 best friends went to the Turks and Caicos islands for an amazing vacation. It was wonderful. Covid-19 - then known as the Corona Virus was in China, we were screened at every airport and honestly didn't think too much about it afterwards.

Then came March. The word Pandemic was tossed out there and things started to get real!!

I have been working from home since 3/17. My state has less than 3500 case so far. Most of those being in Las Vegas. I know that will rise. Our local hospitals are transforming levels of the parking garage into hospital rooms. It is scary and amazing. I am hoping that they are preparing for the worst and it doesn't happen. Yes, I am forever an optimist.

Creatively, I have been pretty busy during this time of Social Distancing. Remember that mermaid I started years ago, like many, many years ago...


Yeah, this one

Well she has a face and a base. I hope to finish her this weekend. Here is where she is now.
 

Yes, she is rough and her neck broke, I didn't think about the weight of the added clay on the neck armature when I hung her up to cool after baking. It's OK, I'll fix that when I add her arms, back and hips. :0) She's got a snarky expression but I love it. Not sure what color hair yet, I'll find out this weekend.


The base is not finished. See that post sticking out the front. That will be apoxied into place with Apoxie Sculpt and then bent so that when my mermaid is attached she appears to be reaching towards the shell. There will be other decorations on it as well. Should be fun.

I'm also working on some 1/12 scale dollhouse dolls. Dollhouses are one of my first loves and I am excited to start working in that size. Here is a picture of the armatures.


and here is a picture of the 2 mm eyes that I made to go on those tine dollhouse armatures! These made my eyes blur as I was making them. So tiny. That white tile in the background is a 4 x 4 inch tile.
2mm Eye Sets

2 mm Eyes complete

Close Up 2 mm eyes

There is more. I'll share some updated island pics, a couple more zombies and other sculptures and more. 

Please stay safe and healthy!! 

D


Sunday, June 11, 2017

Mermaid - Complete


I finally finished the mermaid. I'm very pleased with her!  Next up... Age of Aquarius submission for Art Doll Quarterly, 2017 PC Challenge updates and a Pirate.

Thanks for stopping by.

D

Monday, June 5, 2017

Mermaid update

Mermaid


Here she is so far. As you can see my tail experiment was a success. I love how her tail came out and I didn't have to worry about burning the clay with a heat tool.

I'll post more pictures of her once she is complete. I need to distress her shell bra, add eyebrows and eyelashes and a necklace. I'm pleased with how she is turning out.


Thanks for visiting :)

Tuesday, May 30, 2017

Angelina Film – The Baking Experiment

I’ve been working on a mermaid for a contest being hosted by Jack Johnston and I’m very pleased with how she is coming out. As I was getting ready to add her tail fin I did a lot of research. I looked at videos, I did a google search, I looked at YouTube and most of what I found recommended to add the fin then bake the clay used to attach it to the body with a heat gun. Yikes! That sounded a little scary to me.  Heat guns get hot, much hotter than the temperature necessary to cure clay so I thought I would do an experiment with baking the Angelina Film, on the doll, in the oven.


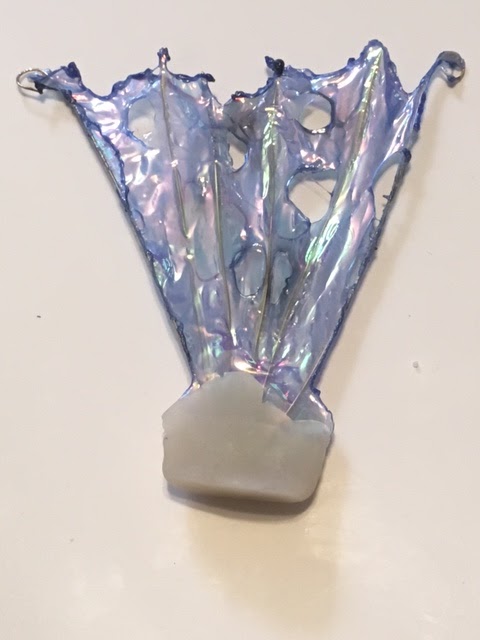
This is the faux tail I made for my 1st experiment. I used “The Ultimate” glue to attach the wires to the bottom layer of film. When adding the glue to the wires I used a needle and applied a thin layer to both the top and the bottom of the wire. I then added another layer of film on top of the wires and trimmed the excess film from around the wires. Once I had the basic shape I covered the base in translucent clay, making sure the bases of all the wires were enclosed in clay.

I baked the tail in a pre-heated oven at   ̊275. At first I thought it would be a total fail because the film immediately shrunk a bit, but then it stabilized. My original goal was to see if I could bake it for 15 minutes. That came and went so I continued for a total of 30 minutes which was my ultimate goal. Why 30 minutes? Because the clay that I prefer bakes for 30 minutes per ¼ inch to cure properly. I knew I could attach a tail with ¼ inch or less thickness of clay so this was the perfect amount of time.


Here is what it looked like when I removed it from the oven after 30 minutes. Notice that the film is not super shiny and there is a gap at the top where the two separated.


Here it is once I heat the film with a heat tool and shaped it with a candle flame. Using the heat gun adhered the two layers of film together and made it shiny and translucent.

I consider this a success.


For my second try I went with a larger tail, one closer to what I will need for my mermaid.

I used the same steps, gluing the wires onto the film and adding a second layer of film on top of the wires. Shaping it and baking it for 15 minutes. This time the clay that I used on then end was only 1/8 in thick so I did not need the full 30 minutes.


Here it is direct from the over


Here it is once I heated it with a heat tool and shaped it with the candle flame.


 Here are both experiments. I’m very pleased. Yes, I know the tails look a bit ratty and have soot on them, I wasn't going for perfect, just making sure the film reacted the way I wanted it to.  

***Before baking your Angelina film test bake a sample to see how the color shifts***

My next step will be to design the tail for my current mermaid. Scary stuff. I am so happy with how she is turning out that I do not want to ruin her with a bad tail, but she needs a tail!


Here she is trying on one of the practice tails. 

She just came out of the oven and now has arms. Next up I'll be adding her hands, a tail and her hair. Stay tuned for more pictures

Friday, May 26, 2017

Mermaid - in Progress


This is the latest project I am working on. Once complete she will be sitting in an abalone shell holding a pearl. At least that is my current plan, we shall see how she feels about it this weekend.

I'll post more progress pictures this weekend.
 

Wednesday, September 21, 2016

Weekend Sculpting Class with Kate Church

This past weekend I was lucky enough to spend with Kate Church, a fabulous doll artist, sculptor and painter. She is down to earth, soft spoken and just an amazing person. This is the third class I have taken with Kate and it was so much fun. The theme of the class was transformation and we each choose a figure that was part animal and part human so of course I HAD to make a mermaid...


She definitely was made using Kate's techniques and her style. I am thrilled with how she turned out and will be making more mermaids for my booth at the McQueen Craft fair which is coming up October 14-16 - YIKES!

She hasn't told me her name yet but now that she is home I am sure she will soon.


Tuesday, January 26, 2010

Mermaid Armature: Part 2


Here is the mermaid with her arm tube attached and cemented in place. I love sculpts at this stage, they have the form and feel of what the finished piece can become. I had a slight mishap while preparing her for the tube. I wanted to place it higher on her arm than I had room for due to the epoxy so I went crush off some of the epoxy and ended up snipping off her arm at the elbow – oops! Fortunately I don’t think it will be too noticeable once she is complete since she is reaching for something and her arm is supposed to be fully extended. I will just have to make sure I sculpt in an elbow so she looks natural. More epoxy is needed over the tube to add extra strength and then she is ready for clay! I hope I can do her justice.

Have a great day,

Debbie

Wednesday, January 20, 2010

Mermaid Armature


Here is the armature for my first ever mermaid. Her armature was created using aluminum wire. I have used epoxy sculpt to fill out her tail and rib cage areas so the clay on those areas will not get too thick. I still need to add more epoxy sculpt to her arms and wrist so that she can support herself on the stand and add the tube in her arm that will be where she is attached to her sea shell base. Her tail is heavy and I would hate for her wrist to crack under the pressure!

I am still contemplating which color scheme to use on her. I have a beautiful ice blue, lush sea greens and then a mix of pastel pinks, purples and blues. I am currently leaning towards the blues. I guess we’ll see what she wants when it is time

Have a wonderful day,
 
Debbie