Thanks for stopping by. For a peek at my studio click here.
Showing posts with label Ball Jointed Doll. Show all posts

Thursday, November 2, 2017

Ball Jointed Doll Update - Makeup!


I have been working hard to complete a macroeconomics class and haven't had too much time to do anything fun. Today is my final... wish me luck :0)

Here are the most recent pictures of my Ball Jointed doll.

She has makeup! Yes it is gold and dramatic. She is a steampunk girly after all. I may add a bit more eyeliner but not until she is costumed. I still need to style her hair and will then start on her costume. I have a pile of cool things to play with once I get to that point.


Her left arm is getting replaced before I make her costume. It isn't seated properly in the shoulder joint and I want to fix that before I move on. I love that I can fix things like arms, hands, feet... without destroying the doll.

I am very happy with how she is turning out. I won't be able to get to her for at least another 2 weeks due to my crazy schedule but I'll get to her!

Monday, October 16, 2017

Ball Jointed Doll Update - She has Hair!

This project has been fun and I've learned so much while creating this doll. When I make another one there are things I will do differently but overall I am pleased with how she is turning out.

I didn't get her done in time to enter the contest but I'm OK with that. I had too much going on with my family to worry about finishing a doll and I didn't want to rush her costume.

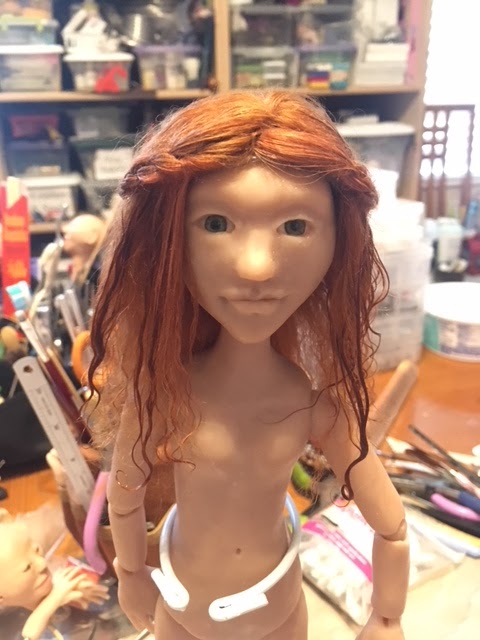
I was happy to get to work on her this week and now she has hair!

I've never made a wig cap for a doll before. It was not difficult, just time consuming since I had to wait for it to dry before I added the hair.

Wig Cap - Drying

Wig Cap - Cut to Fit

Hair! 

Profile 

Hair - Dried and Ready for final Styling

I am very happy with her hair. I will be adding some smoothing oil to it - just a tiny bit - to tame it and the will be adding some curls on both sides of her face. She will be getting some steampunk goggles or a top hat so I won't be doing anything to the top of her hair.  

Her face still needs to be painted, her wig does come off so that won't be a problem! Aside from the initial wait time, making the wig was simple and I love the possibilities of changing her hair.

Next steps... face and body painted then costume. We are in the home stretch. Once she is done I will be working on a Pirate to go with my mermaid for Art Doll Quarterly's "Ahoy Matey" contest and then a doll for their "Haunted Fairy Tales" contest.

Thanks for stopping by!

Saturday, October 14, 2017

Steam Punk Ball Jointed Doll - Update

With everything going on there was no way I would be able to finish this sweet doll before the contest ended but I am going to finish her.

Here she is with her "wig cap" drying. She is not happy right now but soon she will have lovely red hair and that will make her very happy. I may do another wig just for fun and give her sassy blonde hair. I figure since I am going to all the trouble of making a wig instead of gluing the hair directly to her head, I may as well make 2 wigs - because I can!


Here are some of the fabrics I found. I don't know if I will be using any or all of them on her but I am really excited to get her costume done. I also have a box full of leather, lots of gears, watch and clock parts and fabulous other metal embellishments to use to create her Steam Punk outfit.


Once I finish her costume I will be going back and redoing her left arm, her hands and her feet. Her left shoulder joint is off so her arm sticks our at a weird angle, her hands are too big and her feet are too small. That is part of the beauty of the Ball Jointed Doll. I can fix those issues without destroying the doll. I can give her more expressive hands, change her hair, arms, legs, hands, feet... I can continue to work on improving this doll - forever! I won't, but I can :0)

The nice thing about that plan is that I will be making a removable costume which takes me back to my cloth doll roots. I used to make cloth dolls with lots of different outfits for my daughter. She was nowhere near as fascinated as I was with dolls...sigh!

I'll post more about her once her hair is done.

Tuesday, September 12, 2017

Ball Jointed Doll - Sculpting Done

 Sculpting Complete

Well, she isn't perfect and she doesn't stand on her own (yet) but I'm pretty happy with her. I am going to make some adjustments with the elastic to see if that will make a difference but my main goal is to make her wig and start costuming! The theme for this contest is Steampunk. I have so many ideas, now to translate them to a costume.

 
Standing - not quite on her own

You'll have to excuse my messy studio! I have been working on several things at once and it shows. I am leaving next week for my daughter's wedding so I am hoping to finish her this weekend. I'll post pictures once she has hair and then again with her costume!


Sunday, September 10, 2017

Ball Jointed Doll - Update


She is coming along. I have some work to do before I can finish her. The leg elastic needs to be lengthened, her hands are too big so I need to make new ones and one of her shoulders is too big so I will redo the whole piece. The most important thing that I found is that her neck needs to be reinforced so that it does not crack. I had her legs strung and her head on and I noticed a crack starting along the neck line of her head. I will be reinforcing the neck ring and then painting and blushing everything so that I can string her. I think I can get this done today. Once she is strung I will start on her wig cap (one more thing I've never done :o)

This has been an interesting process. I've enjoyed learning how things fit together, what I need to do to help things fit together and most importantly how to string the elastic which shows me more things I need to do to make everything work together.

To be completely honest, I never thought I would try to tackle a Ball Jointed Doll. I always though it to be beyond my skill level. But I saw a contest on ArtDolls.com... and I bought the kit... and I watched the videos.. and while it is very time consuming it has been fun and I have learned that if I push myself my skill level increases.

I have several other projects that I need to get started on asap so I hope to at least finish sculpting and building her today! (fingers crossed). I'll update as soon as she is standing!


Wednesday, August 16, 2017

Another Contest from ArtDolls.Com - Steampunk Ball Jointed Doll

I am having such a great time working through the ArtDolls.Com contests. The current one is a simple ball jointed doll. If you are interested in joining in on the fun here is a link to the contest kit.

I have never made a ball jointed doll before. Until this week I did not think I was skilled enough to do it, however, joining this contest has changed that.

Here is the start of my ball jointed doll.

Head

Head sitting on torso

 Head and Torso

The contest is for a simple ball-jointed doll dressed in Steampunk fashion. The video demonstrates sculpting a much younger and smaller doll than what I am creating but I am utilizing the same techniques so I should be OK. 

I don't sculpt child like dolls and since this sweet girl wanted to be here I just went with it. I will be working on her arms, legs, hands and feet this week. She is due before September 15th as is the Art Doll Quarterly entry for their Age of Aquarius challenge which I am also working on. 

This has been an exciting project for me. I tend to procrastinate when I am unsure of something but in the very beginning of the videos that go along with this contest Arpyl Jensen tells you to take it one step at a time. You focus on one part of the doll, for instance, it isn't overwhelming to sculpt a single leg. Then you focus on the next, then the next until you have a complete doll. So I sat down and sculpted her head, then I moved on to her torso. Next I'll do her legs... I am thrilled with how she is turning out and I am really looking forward to costuming her. I love the Steampunk style and had so many ideas I may need to make friend for her so I can do more than one costume!

Another new process I will be experimenting with on this doll is blushing and painting with the Genesis heat set paints. I've seen them used. I have them, but I've never used them, so with this doll I will be using them which is why she has no color on her face.

Once again I have to say... seek out challenges for your art. Try something that scares you. Your skills will grow by leaps and bounds.