Thanks for stopping by. For a peek at my studio click here.

Monday, October 16, 2017

Ball Jointed Doll Update - She has Hair!

This project has been fun and I've learned so much while creating this doll. When I make another one there are things I will do differently but overall I am pleased with how she is turning out.

I didn't get her done in time to enter the contest but I'm OK with that. I had too much going on with my family to worry about finishing a doll and I didn't want to rush her costume.

I was happy to get to work on her this week and now she has hair!

I've never made a wig cap for a doll before. It was not difficult, just time consuming since I had to wait for it to dry before I added the hair.

Wig Cap - Drying

Wig Cap - Cut to Fit

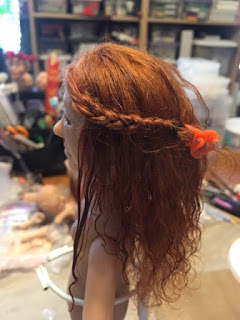
Hair! 

Profile 

Hair - Dried and Ready for final Styling

I am very happy with her hair. I will be adding some smoothing oil to it - just a tiny bit - to tame it and the will be adding some curls on both sides of her face. She will be getting some steampunk goggles or a top hat so I won't be doing anything to the top of her hair.  

Her face still needs to be painted, her wig does come off so that won't be a problem! Aside from the initial wait time, making the wig was simple and I love the possibilities of changing her hair.

Next steps... face and body painted then costume. We are in the home stretch. Once she is done I will be working on a Pirate to go with my mermaid for Art Doll Quarterly's "Ahoy Matey" contest and then a doll for their "Haunted Fairy Tales" contest.

Thanks for stopping by!

Saturday, October 14, 2017

Steam Punk Ball Jointed Doll - Update

With everything going on there was no way I would be able to finish this sweet doll before the contest ended but I am going to finish her.

Here she is with her "wig cap" drying. She is not happy right now but soon she will have lovely red hair and that will make her very happy. I may do another wig just for fun and give her sassy blonde hair. I figure since I am going to all the trouble of making a wig instead of gluing the hair directly to her head, I may as well make 2 wigs - because I can!


Here are some of the fabrics I found. I don't know if I will be using any or all of them on her but I am really excited to get her costume done. I also have a box full of leather, lots of gears, watch and clock parts and fabulous other metal embellishments to use to create her Steam Punk outfit.


Once I finish her costume I will be going back and redoing her left arm, her hands and her feet. Her left shoulder joint is off so her arm sticks our at a weird angle, her hands are too big and her feet are too small. That is part of the beauty of the Ball Jointed Doll. I can fix those issues without destroying the doll. I can give her more expressive hands, change her hair, arms, legs, hands, feet... I can continue to work on improving this doll - forever! I won't, but I can :0)

The nice thing about that plan is that I will be making a removable costume which takes me back to my cloth doll roots. I used to make cloth dolls with lots of different outfits for my daughter. She was nowhere near as fascinated as I was with dolls...sigh!

I'll post more about her once her hair is done.

Thursday, October 12, 2017

Update to Updated Week 34 Head - She is Painted

In this post I showed you the changes I made to my week 34 #2017PCChallenge head. I added more clay to "flesh out" the face and it improved it immensely.

I finally got around to using the Genesis Heat Set paints to paint her. I've haven't really used these paints too much so this was an experiment. I found that I need different paint brushes so that I have better control and I also need to mix some different colors for blushing before I do this again. Since I love to shop for tools I will be paying a visit to the craft store soon.

Here she is:

Before Adding Cheeks

Cheeks Added
Using Genesis Heat Set Paints

There is always a learning curve when you learn to use a new medium. These paints are interesting and give a sheer, realistic color to the face. I will need to add additional layers to get the look I want but overall I am pleased with my first real shot at painting a face with these paints. 


Tuesday, October 10, 2017

2017 Polymer Clay Challenge Update


It's been a fun and crazy year so far. A lot has happened on the home front, some good, some not so good but I have still been sculpting away. I think next year for the Polymer Clay Challenge I will be working on making dolls out of all of these heads. I am getting quite a collection of heads in my studio. Some a fantastic, some are interesting and some are odd, all of them are mine and I am happy with each of them. Every head that I create teaches me something.

I made the eyes for each of the following heads using a technique developed by Apryl Jensen of Makingfairies.com. She is a very talented artist and the tutorial for Luminescent Eyes is free with a $30 purchase on her website. Here is a link to her tutorial page.

Here are some of the heads that I completed for the #2017PCChallenge that I have not posted yet:


Lush lips. Green Eyes. I'm thinking red hair! I may have to add some more to the lower part of the face to balance out those lips but we shall see once I start playing with hair. She doesn't look as odd in person, the angle of the picture makes here look stranger than she is!

Love those lavender eyes! I'm very please with this one. Not sure who she is yet but I am sure she will let me know soon. 

This is a happy elf. He came together pretty quick. 

Another happy elf. This one will be getting more freckles. This sweet elf was born while I waiting for my husband to get our of surgery last week. She is smirking, maybe because I was spread out on the table in the surgery waiting room playing with clay while all the other people were sitting quietly, reading or watching TV. I got some odd stares but sculpting soothes me so I didn't care! 

Sunday, October 8, 2017

Zombie Doll Swap - What I Sent


***The package finally arrived yesterday so I am re-posting what I sent****

The package I sent for the Yarnigras Swapper Spot Party Zombie swap should arrive today. Since the person I sent it to has no idea it was me I wanted to share what I sent out.

I give you Bride Zombie

I had such a great time making Bride Zombie. I felt a little bad that she had to be a zombie but she loved her dress, even after it was gored up!

Included in the swap package with Bride Zombie was a fun Halloween jar with a sculpted pumpkin on the cork, one of my 3" sculpted pumpkins and some fun goodies - Halloween tissues, giant googly eyes and a couple other silly things.

As always, this was a great swap and I am so happy with how this zombie turned out.I had a very hard time sending her on her way. Hopefully her new mom will like her.

She is fully pose-able and stands on her own. Her veil is removable and she also has a bouquet of roses. Her dress is made from a ribbon embroidered lace that I purchased in the fabric district in Los Angeles a couple years back. It was exactly what I needed for Bride Zombie.


Before Baking

Before Costume was Zombified

 Close up of Bride Zombie after painting and costuming


Exposed Brain... Of course!

Back view and boquet

Halloween Jar with sculpted Pumpkin cork

With Veil


Thank you to Val at Yarnigras Swapper Spot for hosting amazing Zombie swaps! I am so honored to be part of the group :0)

Friday, October 6, 2017

Swap Package Delivery Delayed

I am so disappointed. The package that I sent has been delayed. I don't know when it will be delivered so I pulled the post off the website until it arrives. I will put it back up as soon as the package gets to its new home.