This week I have been overwhelmed with insurance issues stemming from my oldest son's car accident as well as taxing said son to and from college since he is currently without a vehicle after he totaled his car in above mentioned accident. Fortunately, no one was hurt so the minor inconveneinces of insurance paperwork and being a taxi driver for a couple of weeks are fine with me! I plan to be back to work on my creative projects this week so check back soon for some updates.
Take care and drive safe :)
Debbie

Sunday, January 31, 2010

Tuesday, January 26, 2010
Mermaid Armature: Part 2

Have a great day,
Debbie
Sunday, January 24, 2010
The Goddess

I am pretty happy with how her features came out. I think her eyes are roughly the same size and shape ( a lot harder to do that you would think) and her lips are not too crooked LOL I am not happy with her ears but I have a few techniques to try on my next piece to correct what I am unhappy with. Overall all I have really loved every piece I have made. Each one is better technically than the last.
If you have been reading my posts, you can see that I seriously suffer from ADHD so I am always working on more than one project. Keep checking back, I will finish them all eventually.
I have to add a disclaimer here: as much as I want this sculpt to be a Goddess, she may not be, she may have a different opinion. So, if I post her completed pictures and she ends us as a volleyball player you'll know that it was what she wanted LOL. If you create dolls you know what I mean!
Have a great day,
Debbie
Friday, January 22, 2010
My Goblin

You can't really see the warm green tone of his skin in these pictures. Once his costume is complete I'll post more pictures of him.
Debbie
Wednesday, January 20, 2010
Mermaid Armature

Here is the armature for my first ever mermaid. Her armature was created using aluminum wire. I have used epoxy sculpt to fill out her tail and rib cage areas so the clay on those areas will not get too thick. I still need to add more epoxy sculpt to her arms and wrist so that she can support herself on the stand and add the tube in her arm that will be where she is attached to her sea shell base. Her tail is heavy and I would hate for her wrist to crack under the pressure!
I am still contemplating which color scheme to use on her. I have a beautiful ice blue, lush sea greens and then a mix of pastel pinks, purples and blues. I am currently leaning towards the blues. I guess we’ll see what she wants when it is time
Have a wonderful day,
Debbie
Monday, January 18, 2010
Fairy Hats?
The treasure chest is almost complete. I have to finish the treasure map that goes inside the bottle then make the sea shell base the chest will rest on. I also have to figure out the angle that I need to secure the post that the mermaid will be attached to through the chest and in to the sea shell base so she looks like she is reaching for something in the chest. I’ll have more pictures of that later this week or so depending on time. I wanted to share the last of my After-Christmas Sale finds.
 These beautiful jeweled cones were at Michaels. I have no idea what they were used for but there was apparently an entire line of matching items. When my son walked in to my office he asked “Where’d you get the Fairy hats?” Of course that comment sent me on many fun tangents but I purchased these to make Christmas Tree Angels. I thought to use the cone as a base and plan to sculpt the head and hands out of polymer clay and then dress them in matching fabrics and jewels. I may have to make one fairy hat though, in honor of my boy.
 I also found these great sparkley, golden curlies. These are from the floral section at Michaels and will be fantastic additions for wings and things!
Have a wonderful day,
Debbie


Have a wonderful day,
Debbie
Wednesday, January 13, 2010
Treasure Chest Part 2
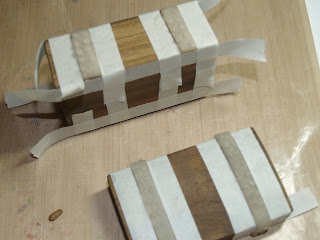
Working with gold leaf is so much fun. If you want to get a “WOW’ result, gold leafing is the way to go.


These are some of the goodies that will make up the treasure for this cute little chest.
Check back soon to see the completed chest filled with goodies. The bottle will have a treasure map inside and I have some tiny pearls and gold chains to drape through it. Then on to build the rest of the base for this.
Thanks for looking :)
Debbie

Taped and ready for gold leaf

Gold leafed bands complete.

Here is the treasure chest with gold leafed bands and 2 coats of sealant. Now for the final phase of detailing, antiquing and distressing

Black paint is added to give a distressed, aged look. I applied a heavy coat of paint then used a Q-tip to remove the excess and get the look I wanted.

I have burnished the bands with black paint, let it mostly dry then wiped off the excess to give an aged appearance. I added a few lines on the wood to age the chest itself then the hardware got the same treatment and was re-attached to the chest.

Here is a side by side comparison of the chests, before and after. Not to shabby for a chest that cost less than a dollar at Michaels!

These are some of the goodies that will make up the treasure for this cute little chest.
Check back soon to see the completed chest filled with goodies. The bottle will have a treasure map inside and I have some tiny pearls and gold chains to drape through it. Then on to build the rest of the base for this.
Thanks for looking :)
Debbie
Subscribe to:
Posts (Atom)