This week I have been overwhelmed with insurance issues stemming from my oldest son's car accident as well as taxing said son to and from college since he is currently without a vehicle after he totaled his car in above mentioned accident. Fortunately, no one was hurt so the minor inconveneinces of insurance paperwork and being a taxi driver for a couple of weeks are fine with me! I plan to be back to work on my creative projects this week so check back soon for some updates.
Take care and drive safe :)
Debbie

Sunday, January 31, 2010
Tuesday, January 26, 2010
Mermaid Armature: Part 2

Have a great day,
Debbie
Sunday, January 24, 2010
The Goddess

I am pretty happy with how her features came out. I think her eyes are roughly the same size and shape ( a lot harder to do that you would think) and her lips are not too crooked LOL I am not happy with her ears but I have a few techniques to try on my next piece to correct what I am unhappy with. Overall all I have really loved every piece I have made. Each one is better technically than the last.
If you have been reading my posts, you can see that I seriously suffer from ADHD so I am always working on more than one project. Keep checking back, I will finish them all eventually.
I have to add a disclaimer here: as much as I want this sculpt to be a Goddess, she may not be, she may have a different opinion. So, if I post her completed pictures and she ends us as a volleyball player you'll know that it was what she wanted LOL. If you create dolls you know what I mean!
Have a great day,
Debbie
Friday, January 22, 2010
My Goblin

You can't really see the warm green tone of his skin in these pictures. Once his costume is complete I'll post more pictures of him.
Debbie
Wednesday, January 20, 2010
Mermaid Armature

Here is the armature for my first ever mermaid. Her armature was created using aluminum wire. I have used epoxy sculpt to fill out her tail and rib cage areas so the clay on those areas will not get too thick. I still need to add more epoxy sculpt to her arms and wrist so that she can support herself on the stand and add the tube in her arm that will be where she is attached to her sea shell base. Her tail is heavy and I would hate for her wrist to crack under the pressure!
I am still contemplating which color scheme to use on her. I have a beautiful ice blue, lush sea greens and then a mix of pastel pinks, purples and blues. I am currently leaning towards the blues. I guess we’ll see what she wants when it is time
Have a wonderful day,
Debbie
Monday, January 18, 2010
Fairy Hats?
The treasure chest is almost complete. I have to finish the treasure map that goes inside the bottle then make the sea shell base the chest will rest on. I also have to figure out the angle that I need to secure the post that the mermaid will be attached to through the chest and in to the sea shell base so she looks like she is reaching for something in the chest. I’ll have more pictures of that later this week or so depending on time. I wanted to share the last of my After-Christmas Sale finds.
 These beautiful jeweled cones were at Michaels. I have no idea what they were used for but there was apparently an entire line of matching items. When my son walked in to my office he asked “Where’d you get the Fairy hats?” Of course that comment sent me on many fun tangents but I purchased these to make Christmas Tree Angels. I thought to use the cone as a base and plan to sculpt the head and hands out of polymer clay and then dress them in matching fabrics and jewels. I may have to make one fairy hat though, in honor of my boy.
 I also found these great sparkley, golden curlies. These are from the floral section at Michaels and will be fantastic additions for wings and things!
Have a wonderful day,
Debbie


Have a wonderful day,
Debbie
Wednesday, January 13, 2010
Treasure Chest Part 2
Working with gold leaf is so much fun. If you want to get a “WOW’ result, gold leafing is the way to go.


These are some of the goodies that will make up the treasure for this cute little chest.
Check back soon to see the completed chest filled with goodies. The bottle will have a treasure map inside and I have some tiny pearls and gold chains to drape through it. Then on to build the rest of the base for this.
Thanks for looking :)
Debbie

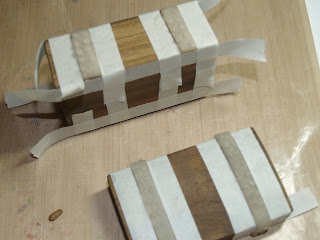
Taped and ready for gold leaf

Gold leafed bands complete.

Here is the treasure chest with gold leafed bands and 2 coats of sealant. Now for the final phase of detailing, antiquing and distressing

Black paint is added to give a distressed, aged look. I applied a heavy coat of paint then used a Q-tip to remove the excess and get the look I wanted.

I have burnished the bands with black paint, let it mostly dry then wiped off the excess to give an aged appearance. I added a few lines on the wood to age the chest itself then the hardware got the same treatment and was re-attached to the chest.

Here is a side by side comparison of the chests, before and after. Not to shabby for a chest that cost less than a dollar at Michaels!

These are some of the goodies that will make up the treasure for this cute little chest.
Check back soon to see the completed chest filled with goodies. The bottle will have a treasure map inside and I have some tiny pearls and gold chains to drape through it. Then on to build the rest of the base for this.
Thanks for looking :)
Debbie
Monday, January 11, 2010
Making a Treasure Chest
One of the most attractive things about doll making is that it can incorporate almost any type of art or craft that you enjoy. While making dolls I have incorporated sewing, embroidery, sculpting, painting, wood working, miniatures, rubber stamping and more.
As a child I loved doll houses and all the tiny stuff you could buy or make for them. I spent hours reading miniature magazines and sewing tiny clothes or teddy bears for the tiny people I had. Those tiny accessories were so amazing to me. As an adult, I have delved into the miniature arena as a part of my doll making. My scale is not the traditional dollhouse scale of 1:12 but the items I create for my sculptures are still on the small side and so fun to make I could do it all day.
Currently I am working on several projects but one of them keeps calling my name! She is a tiny 8” mermaid that is in the very beginning of the sculpting process. She has a body armature and I have a plan. I am so excited about making a mermaid. My grandparents lived across the street (literally) from the Rehobeth Bay in Delaware and I spent every summer with them until I went to college – and even a couple after that. When I was growing up, my grandfather was out on the ocean by 6:00 am every morning, sometimes earlier and if I was up, I was out there with him. I learned to swim when I was tiny and could drive and dock a boat by the age of 8, fillet a fish by 9 and caught and landed a 20 pound tuna at age 11 (a lot tougher than it sounds!!)
The ocean is a haven for me. I love the sounds and smells of it and feel as at home on the deck of a boat as I do on land. I think, because I have other sculptures that I have to finish before I can start on her, I am seeing things for her everywhere so as a compromise with myself (yeah, I know silly – but I hate the guilt of an unfinished gift!!) I am working on the display that she will be in. I have shells and sand, a pretty round base and I am making a treasure chest for her.
Here are some in progress pictures…
I bought the chest below from Michael’s for $1 (Ok, I really only paid .80 for it since I had a 20% off coupon!) It is a simple pine box.

The first thing I did was to remove all of the hardware from the box and sand it down so that it was fairly smooth (not too smooth, it is a pirate chest after all).

I added a nice base coat of Raw Umber paint.

Once the paint was dry, I sculpted the “metal bands” out of Prosculpt clay. I then baked the bands right on the piece. I had to stand in the kitchen watching the oven to make sure that my little treasure chest didn’t burst into flames.

Now comes the fun part, painting some details on the chest, gold leafing and antiquing the bands and hardware then filling the chest up with treasure. I already have a treasure map that will fit into a tiny bottle, some tiny strung pearls and a mini strand of real garnets that will be calling the chest home. I am searching for more fun things to put in there. Check back soon to see the finished chest.
Thanks for visiting,
Debbie
Saturday, January 9, 2010
More Fabulous Finds
Being broke can be a huge drawback when you are beginning to create and looking for the perfect stuff to embellish with. This past year has been a tough one but creating is one of the few things that has kept me sane (ok, mostly sane) so I have had to become very resourceful.
Many of my materials have been scavenged, first from my own closet then from thrift stores. Here are some of my favorite finds which I will be using in the next few weeks. The dark one is actually a pillow cover. It has a gold, embossed pattern of satin covered with a matching sheer organza over the center and only cost me $1. The lace is an old curtain I got in Canterbury, UK for about $1.50 (I was rummaging through thrift and antique stores for just this kind of stuff) and the cream colored fabric is a dress I got at Savers when I found the pillow cover. It set me back about $6 but it is large and I will get a lot of use out of it. Once I clean these I will cut them into usable pieces.

I am off to do some laundry so I can start playing with these, have a great day!!
Debbie
Thursday, January 7, 2010
Fabulous Find
I just love book boxes. I have one that I got while in London from the Museum of Natural History. The title of mine is “On the Origin of Species" by Charles Darwin. Isn’t it is just wonderful?

Well, I am currently working on a fairy that was supposed to be a Christmas gift and while I was out today I found the coolest box to put her in when she is finished.

This pretty little book box is just perfect to hold a complete fairy. I can’t wait to finish her and send her to her new home.
None of my sculptures have ever left me, but right now I am putting the finishing touches on 2 that will be leaving for new homes. I am not sure how I feel about that yet. It makes me sad, nervous and happy all at the same time. Yikes!
I’ll post a picture of the complete fairy in her box before she leaves.
Take care
Debbie
Tuesday, January 5, 2010
Inspiration...

Official Movie Poster
Debbie
Sunday, January 3, 2010
Fun find in the clearance aisle
Don't you just love the after Christmas sales? I found these gorgeous flowers for 60% off.

What do you think?? Won't they make fabulous Fairy wings? I can't wait to try them out. I should be able to get at least 2 sets of wings per flower.
Right now I am planning out my next few sculpts. I have a mermaid, a goddess, and a couple of fairies in the works. At least that is what I am planning. We'll see what they think as I move along, well except for the mermaid; she gets a tail no matter what :)
I'll update more as I go.
Have a wonderful day,
Debbie
Friday, January 1, 2010
2010 Priorities
Yes, it is that time of year again....
New Year's resolutions
This year rather than making resolutions I have made a list of my priorities. It seems to me that resolutions are so easy to let go of or forget about but a priority, well just the term priority gives it little more weight, makes it something that is important.
So here are my priorities for 2010
• To sculpt, stamp and garden more and stress less
• To spend more time living and playing out in the real world and less time (just more productive time) on my computer - I will blog more and "surf" less :)
• To take care of me (yes, I see the cliché weight loss "resolution" as well but the better I feel the more fun I can have in life!!)
As you can see I have not made a lot of things priorities, only the things that I feel will make my life better. I am blessed with a wonderful family and amazing friends and this year I'd like to spend more time with them.
A final thought.... as I was catching up with my favorite artistic guru Tim Holtz's blog this afternoon I found a picture of a doll he has hanging in his room (see his November 2009 archives). It resembles a voodoo doll but probably isn't. Anyway, this doll has a button on it with the following sentiment -
"Never Apologize for Your Art"
How beautiful is that thought. I have always been drawn to the odd and offbeat, to the dark and strange and unusual. Because my taste in, well pretty much everything, is off the beaten path I have always apologized for it. Not anymore. When I saw that button stuck to Tim's doll I felt my creativity stir. I can't wait to see what I create (or maybe unleash is a better word) in this New Year.
Stay tuned.... it could be a wild artistic ride!
Happy New Year!
Debbie
Subscribe to:
Posts (Atom)