Thanks for stopping by. For a peek at my studio click here.
Showing posts with label work in progress. Show all posts

Wednesday, April 8, 2015

Figure from Class - A Better Picture

Here is a better picture of the figure I created this weekend - she was not happy that I didn't share a good one :0)

She is wearing leather boots (which are almost complete), a leather bustier and a necklace of strung garnet beads. Though they are hard to see in the picture, she also has feathers in her hair. 

She is very gypsy-like and is evolving as I accessorize her! The trim around her waist isn't tacked down yet and her headpiece is not complete but they are at least in progress and thankfully I am having a great time with her!

I'll post more soon.

Tuesday, April 7, 2015

Update - Froud Workshop

Toby Froud, Digby and Me

I am home from Portland and the amazing Wendy and Toby Froud workshop. I had such a fabulous time and I am wiped out! Above is a picture of me and Toby, along with Digby, the star of Toby's short film Lessons Learned.

Wendy Froud and Me

Wendy is a warm, talented and genuine soul. She is kind and friendly and so easy to be around. It was just amazing to watch her and Toby as they created this weekend. They are willing to share their talent, tips, tricks and knowledge and if you ever get a chance to meet them - Do it! Wendy inspired me to sculpt and every time I take a class with either her or Toby I learn more. My skills expanded this weekend and it was wonderful.

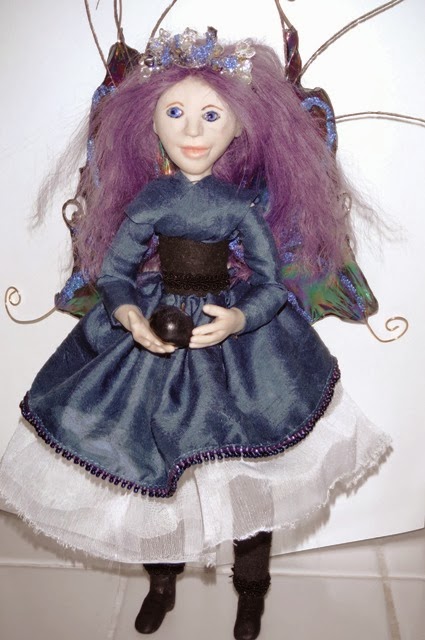
My creation is not quite done but here is a peek at her. She is sitting on the dashboard of my friends car so the picture isn't the best.

She stands about 16 inches tall and was so much fun to make! I'll be showing you the very first sculpture I ever did alongside this sweet girl to show you that practice is really all you need to increase your skill level - ok, and maybe some really great teachers! If live classes are not available in your area DVDs are the way to go! Wendy does have a couple of DVD sets that are available and if you are interested in sculpting fairies or character figures of any style, I would highly recommend them.

I am working on her jewelry and head piece right now. She may get wings though that is entirely up to her. I hope to show you the completed piece by the end of the month, regardless of her state of completion, I'll update with some comparison pics this weekend.

Stay tuned for my class recap and my experiences on the road!


Wednesday, October 1, 2014

Sneak Peek

Here are a couple of sneak peeks of some items I have been working on for the Arts & Craft Show - which is less that 3 weeks from today - Yikes!


As you can see each of these is in a different stage of completion. The center piece will be a fairy sitting on a swing in a bird cage - yes, I have a think about bird cages who knew!

Santa is ready to go and the pumpkin head sculpt is getting the finishing touches this weekend. I have a magnificent cone fairy that is almost done, I'll share her soon. Her base was made with one of the cones I wrote about here. I had no idea what I was going to do with them but I am so glad they've been sitting in my studio all this time!

Check back soon for some fun glimpses of the "less that 3 weeks to go" chaos!


Saturday, August 9, 2014

Beads and Bezels and Chains – Oh My!

As I delve more and more into the business side of art I have studied what I buy, what I look at online, what details I am drawn to and so forth and as I hone in on what I like I have taken classes and asked some of the amazing, talented women I know for direction on how to add that special touch.

One of the things I love about figurative sculpture, which I’ve stated often, is that I can use so many different mediums and techniques on a single piece. Lately, as I gear up for the arts and crafts fair season, I have really started focusing on those tiny details, the ones that you don’t think about but that really make a difference.

For instance, now that I know how, I have to add beads to my figures costumes. These tiny little embellishments make such an impact. They can be subtle, adding a finishing touch to a hem like I used on Indigo

Indigo

Or they can be bold by forming a focal point or major design detail. Beads can be used for jewelry, head pieces, trim and even used to form props. Doll makers often use jewelry findings for details. I’ve seen tiny pocket watches made from a loop necklace clasp; in fact I made one myself for my Hatter in Zombieland figure.

Hatter

Beads are so versatile. I use them for eyes, embellishments, focal points and even for crowns as shown here on my almost finished – just need wings – birdcage fairy:

Birdcage Fairy

As anyone who creates knows you can never have enough bits to play with. About a year ago our area got its first large scale bead shop which was so cool! The people are fantastic, the selection is great and the prices are much better that when I had to fly to Las Vegas to visit a similar store :0) but they don’t have everything I need so I do shop online. The bummer of that is I have to wait for my stuff and I really don’t like waiting.

However, one of the coolest places I’ve found online for beads and findings is Auntie’s Beads. Their selection is unbelievable and their prices are about as close to wholesale as you can get without having a business license. I was so excited with the quality of their merchandise and the super fast shipping that now I don’t worry quite so much about waiting.

Soon I’ll be showing you what I’ve done with my latest Hatter. He is almost done. Here is a sneak peek of his in-progress hat:

Hatter

Soon he will have a jacket, shirt, cravat, pants and so much more! I can't wait to finish him. Once he is complete I’ll show you the details I’ve added that I think make him super special!

Saturday, June 28, 2014

Oops! I Can't Believe I Did That!


This week I have been working as often as possible on my Mad Hatter so that I can send off the last of the photos to the Craft Fair Jury and today, actually just a few minutes ago I realized that I had done something that is so cool that I wish I had thought to do it. (This is how I learn all sorts of things...by accident!)

Let me preface this by saying that when I sculpt a figure I pre-make the eyeballs out of an off white clay mixture and then bake them so that I can set the already hardened eyes in the face and sculpt around them. I make lots of eyeballs and have painted many sets from this batch, however, I usually don't paint them at night so it wasn't until I was set up and ready to go that I noticed the eyeballs of my Hatter were sort of glowing! Yep, I used glow in the dark clay for this batch of eyes and I had no idea.

In the first photo you can sort of tell his eyes aren't quite right. I don't know how to set this camera to take images with a slow shutter and no flash so I sort of had to wing it using different settings. The first was for a night time setting but it still flashed. The last two were done using a sunset setting and you can actually see the glow though the pictures are blurry.


Now that I know I have glow in the dark eyes all ready made I have to make something that needs them! Some fun goblin creature that hides behind books, yep, that's what I'll make- a Book Goblin - so check back in a couple of weeks for that project! Of course I may have to make more eyeballs out of pure glow-in-the-dark clay so they glow brighter.


Here is the Mad Hatter as he is now. He has bones and muscles. Once I paint him I'll add his skin then it's hair, costuming, accessorizing and making his stand.

My mind is too busy to paint right now. He'll be painted tomorrow. I am thinking of all the cool creatures I can make with glow in the dark eyes!

I just love when things like this happen :0)

More pictures to come soon.

Tuesday, May 27, 2014

Progress

This is just a quick post to show you the progress I made over the weekend.


The sculpture I started last week has been fleshed out and I painted her face. I am really pleased with how she is coming along. I‘ll show a lot more in progress pictures later this week, I had such a great time working on these that I just had to share some pictures.


I also sculpted this tiny fairy. She is 8 inches tall and is supposed to be another birdcage fairy but I think she likes the martini class she is sitting in way too much so she’ll probably get her way and be posed in it!

That’s it for now!

Sunday, May 25, 2014

Up Next...

This week I submitted an application for a Craft Fair. It is, in my opinion, the best one in our area and I would be honored to be a vendor. It is a juried show and I had to submit lots of pictures with my application. I should hear something in the next couple of weeks. I am exited though trying to not be. I've already decided that if I don't make the cut I'll still be making the items I have planned and be putting a lot of things on my Sunflower House Art (SHA) Etsy shop which is currently up and ready but not stocked so not open.

I've waited until now to open the SHA Etsy shop because I really didn't want to sell any of my sculpted work until I was proud of the quality of my work. I love what I do, I am very happy with the quality of my sculptures and I am ready to share it with the world. So, you'll be seeing a lot more activity on this blog as I post progress pictures, regardless of which direction life takes me.


Here is one of my current works in progress. She just came out of the oven and I have a couple of ideas for her, we'll see which one she prefers.


I'll be working on the Birdcage fairy this weekend as well. She is still in the same state of costuming that she has been in for months. She is not going to be put up for sale so I am not in a hurry to finish her. I really love her and I've decided that she is going to be hanging out here in the studio rather than fly off to a new home.

My thoughts for the show and the shop both are of creating a mixture of regular and zombified sculpts, I have so much fun with the zombies and I think it shows, there is just somethings fun and fascinating about them. I'm also making a couple different styles of stands and hanging display boxes for my work. A good stand can truly make or break a piece.

I'll keep you posted!

Sunday, April 20, 2014

So Many Projects...


I am so excited to tell you about the swap I am getting ready to work on. While I have lots of works in progress (WIP), I HAD to join in on the fun with the Zombies in the Nursery swap being hosted by Val at Yarnigras Swapper Spot.

Participants will be creating a Zombie character doll for their partner based on one of the 3 Nursery Rhymes that their partner lists on their swap info sheet. How cool is that!

I can envision Little Bo Peep and her Zombie Sheep, Jack and Jill Zombies with a bucket of body parts instead of a pail of water, Jack of Jack and the Beanstalk chomping on the giant, and so much more! I can't wait to see the nursery rhymes my partner lists.

Of course I'll post sneak peek pictures here but won't be able to show the completed project until my partner receives it.

On the WIP front, not much has happened. The past several weeks have been full of work, illness, injury, more work, birthdays, travel for both work and for fun and then more work! Happily, I am done with traveling, no longer sick, finally healed from my injury and ready to get back to work!

The Birdcage Fairy is waiting for her hair to be styled and her clothes to be finished and she is getting pretty impatient. I hope to have her completed soon. She really has waited long enough!

Thanks for stopping by, I am feeling confident that I'll be sharing lots more soon!


Monday, March 3, 2014

Indigo is on her way

I mailed Indigo off to her new mom today. After she arrives on Thursday I'll post the rest of the pictures of her progress including pictures of making her wings.

Next up I'll be finishing the birdcage fairy. She is getting pretty impatient since she is so close to being done but got bumped for Indigo. Her tiara is done. I just need to finish her costume and make her wings. Then I'll need to find a way to get her on the perch of her new home.

I'll also be making some curtains for the bottom of the birdcage and possibly a chair. As you can see this birdcage has lots of potential!


The sweet little fairy will be sitting on the perch in the main cage if I can get her safely in there. The opening to the lower portion of the cage is fairly small so I will have to remove the door. Hopefully she'll be complete this weekend.

Thanks for stopping by


Thursday, February 13, 2014

More Progress Pictures

Here are a few more in-progress pictures of the little faerie.

Mohair is a fabulous medium to work with. You can use styling products on it just like you do your own hair. It is easy to curl and if you don't like the way the hair style turns our all you have to do it wet the hair and comb it.


In the first two pictures I used a dowel that I cut into approximately 1/2 to 1 inch pieces and warpped water dampened hair on, making super easy curlers. I then clipped the "curlers" in place using these darling clips that I found at the dollar store. You can use larger dowels to change the size of the curls. I recommend sanding the edges of your "curlers" so the curled hair doesn't tangle in the cut edge. 


Her hair is full of curlers. She is just waiting for everything to dry to see how they turned out. 


Once her hair dried I was able to remove the curlers. Right now her hair is still a little wild. She'll be getting a crystal tiara and some additional curls once she is costumed. At that time I'll really be playing with those curls. 


She finally got her skin! It still looked a little rough here but that is OK! All of the "muscle" is now covered and she has a shape to her. Since she a younger faerie she does not have that slim, hourglass, figure but I think she is going to be just fine. 


This is the preliminary base of her wardrobe. She still needs lots of work but she is really coming along. I hope to finish her costume this next week and then get to work on her wings and tiara. 

Stay tuned for more progress pictures - hopefully soon!

Saturday, February 8, 2014

Update - Fairy Progress


This is where she was when I updated last week. She had a basic face and limbs but that is it!

Hands and Feet!


Checking her proportions

Fleshing out the body

A little bit of makeup


HAIR!

Here is where we are now.

Now I am waiting for her hair to dry so I can style it. Next up I'll be adding a body stocking to hold everything together and then I'll work on her wings, costume and crown. A new bead shop opened up in Reno so I now have a great place to get what I need to make fairy crowns. 


Friday, January 31, 2014

Works in Progress


My first post of the year was almost on February 1st which would have blown my only resolution for this blog. Happily, as I worked on organizing my studio this month I kept looking at a couple of the sculptures that I am working on and realized that a post about my works in progress was the perfect first post to kick off this new year. 

Mermaid in Waiting

I wrote about this current work in progress on this blog several years ago, seriously, in January of 2010 to be exact and she is in almost the same condition. All I have done is strengthen her arm in preparation for the pose she will have. While she is hanging from the stand by her head, once sculpted she will be reaching into a treasure chest which will be lodged on a piece of coral of some sort or on the ocean floor. I am really looking forward to working on her this year.

Sometimes I think that they have been waiting for my skills to increase enough to work on them and do them justice. Hopefully they'll be satisfied!

Here are a couple of other works in progress: 

Young Fairy

Her home

This little fairy will be posed in the coolest birdcage I have ever found at my local Goodwill store. She is younger than what I normally sculpt but that is who she is and I am certainly not going to argue with her! I am looking forward to finally finishing her so that she can enjoy the home I am working on for her. I have already embroidered a rug for the bottom of the cage and if you look closely I have added potted flowers to the inside ledges. 


This is Alice, she is the first full body sculpt I ever made and she has been difficult. I had problems with the clay cracking and was pretty discouraged but I patched her up and moved on. She is waiting for me to finish her clothing and her stand. She is currently sporting a crown I made during a class. She really likes it so she may just have to be depicted as Alice after her visit with the Hatter :0) We'll just consider the crown a gift from him.


Finally, my Goblin, he was also featured here in January 2010. I’ve made a bit of progress on him. His mock-up detective style coat is in the process of being tailored to fit so that I can make a nice form fitting jacket for him. I’ve started looking for a suitable “Holmes” style wool print to make the final coat with and the chain that is draped around him will be used for a pocket watch chain (industrial strength in case of emergency). 

These are the projects I will be finishing soon, I hope! I believe they have waited long enough.  

Check back soon  to see who got finished first! 

Tuesday, January 26, 2010

Mermaid Armature: Part 2


Here is the mermaid with her arm tube attached and cemented in place. I love sculpts at this stage, they have the form and feel of what the finished piece can become. I had a slight mishap while preparing her for the tube. I wanted to place it higher on her arm than I had room for due to the epoxy so I went crush off some of the epoxy and ended up snipping off her arm at the elbow – oops! Fortunately I don’t think it will be too noticeable once she is complete since she is reaching for something and her arm is supposed to be fully extended. I will just have to make sure I sculpt in an elbow so she looks natural. More epoxy is needed over the tube to add extra strength and then she is ready for clay! I hope I can do her justice.

Have a great day,

Debbie

Wednesday, January 20, 2010

Mermaid Armature


Here is the armature for my first ever mermaid. Her armature was created using aluminum wire. I have used epoxy sculpt to fill out her tail and rib cage areas so the clay on those areas will not get too thick. I still need to add more epoxy sculpt to her arms and wrist so that she can support herself on the stand and add the tube in her arm that will be where she is attached to her sea shell base. Her tail is heavy and I would hate for her wrist to crack under the pressure!

I am still contemplating which color scheme to use on her. I have a beautiful ice blue, lush sea greens and then a mix of pastel pinks, purples and blues. I am currently leaning towards the blues. I guess we’ll see what she wants when it is time

Have a wonderful day,
 
Debbie